

Hello everyone,
Actually, the topic is “What is timescaleDB?” Maybe it’s better to start with. Because TimescaleDB is actually a one of PostgreSQL plugin. If you want to follow the data of a sensor( or similarly when it is necessary to collect continuous time-based data ), you will start to notice that the database starts to slow, over time, and the response time of the queries you write increases rapidly. There are several methods to make your queries faster, in this article I will cover TimescaleDB solution…
What makes TimescaleDB special?
In the standard databases we use (schema-based ones), we often make use of 2 features;
- Primary Key
- Foreign Key
Thanks to these two basic features, we design our table and provide its relations with other tables. However, since we have a time-based (and we want it to work fast) database structure, we have to waive some, if not all, of these in order to work stably. The primary key of a timescaleDB table is the “time” column and is required. Custom tables created in this way are called HyperTables. Instead, it is progressing with solutions in the form of “associatedtablename_id”.
In this way, each TimescaleDB table advances queries over the time column. For those that you need frequently, such as distinct in the queries you will write, you can take a look at how to increase their performance here(link). According to the data published on their official site, timescaleDB has the capacity to work 8000x faster on time-based data. You can find the related article here.
Integration with Django
I’m skipping this part in order not related the article by adding the steps to start a standard django project. Create a random project and create an app. My sample project is named “TimescaleDBwithDjango” and my app name is “example_timescaledb”
The file hierarchy of my project is now like this;
├── example_timescaledb
│   ├── admin.py
│   ├── apps.py
│   ├── __init__.py
│   ├── migrations
│   │   └── __init__.py
│   ├── models.py
│   ├── tests.py
│   └── views.py
├── manage.py
├── templates
└── TimescaleDBwithDjango
    ├── asgi.py
    ├── __init__.py
    ├── settings.py
    ├── urls.py
    └── wsgi.py
Now we can install the django-timescaledb package to integrate timescaleDB into our project;
pip install django-timescaledb==0.2.12
You can set up timescaledb with a docker to set up a sample database, or you can take advantage of the 30-day trial version on its site. In order not to distract the subject, I continue with the explanation over the cloud, you can access the site from here, you can see how you can create a new DB after registering here.
To make it a habit, let’s keep our database information in .env instead of writing it directly into the code. For this, we can use the django-environ library. We write the information we receive from the TimescaleDB cloud into our .env file, and we customize our project to read our database information under settings.py from there;
DATABASES = {
    'default': {
        'ENGINE': 'timescale.db.backends.postgresql',
        'NAME': env("TS_NAME"),
        'USER': env("TS_USER"),
        'PASSWORD': env("TS_PASSWORD"),
        'HOST': env("TS_HOST"),
        'PORT': env("TS_PORT"),
    }
}
If everything went well, it should work when you start the project, but it should give you a warning about migrations;
System check identified no issues (0 silenced).

You have 18 unapplied migration(s). Your project may not work properly until you apply the migrations for app(s): admin, auth, contenttypes, sessions.
Run 'python manage.py migrate' to apply them.
August 16, 2022 - 11:18:49
Django version 4.1, using settings 'TimescaleDBwithDjango.settings'
Starting development server at http://127.0.0.1:8000/
Quit the server with CONTROL-C.
Now that you can see this screen, django was able to connect to the database and it informs us that the migrations are not applied. Now, let’s apply the basic migrations of the project first by applying our migrations;
python manage.py migrate
If everything goes well, the screen you should see is the progress of the migrations one by one by typing “OK” next to them. And when you run the project again the above warning should go away;
sezer@optimist ~/P/TimescaleDBwithDjango> python manage.py migrate
Operations to perform:
  Apply all migrations: admin, auth, contenttypes, sessions
Running migrations:
  Applying contenttypes.0001_initial... OK
  Applying auth.0001_initial... OK
  Applying admin.0001_initial... OK
  Applying admin.0002_logentry_remove_auto_add... OK
  Applying admin.0003_logentry_add_action_flag_choices... OK
  Applying contenttypes.0002_remove_content_type_name... OK
  Applying auth.0002_alter_permission_name_max_length... OK
  Applying auth.0003_alter_user_email_max_length... OK
  Applying auth.0004_alter_user_username_opts... OK
  Applying auth.0005_alter_user_last_login_null... OK
  Applying auth.0006_require_contenttypes_0002... OK
  Applying auth.0007_alter_validators_add_error_messages... OK
  Applying auth.0008_alter_user_username_max_length... OK
  Applying auth.0009_alter_user_last_name_max_length... OK
  Applying auth.0010_alter_group_name_max_length... OK
  Applying auth.0011_update_proxy_permissions... OK
  Applying auth.0012_alter_user_first_name_max_length... OK
  Applying sessions.0001_initial... OK
Let’s create and test our first timescaleDB table, for this, we need a scenario. Let’s say we, as Tony Stark, want to measure the power information of the arc reactor that we carry in our chest. (if you haven’t watched it yet, you’re losing a lot by not watching Iron Man 😀 )
Let’s go to our models.py file and create our table as follows;
from django.db import models
from timescale.db.models.models import TimescaleModel


class ArcReactor(TimescaleModel):
    voltage = models.FloatField()
Fantastic! we now have a hypertable. Let’s save it to the database;
python manage.py makemigrations
python manage.py migrate
We also created our new table and added it to the database. If you are testing over the cloud, you can view how many tables you have under “services” in the interface and how many of them are hypertable;
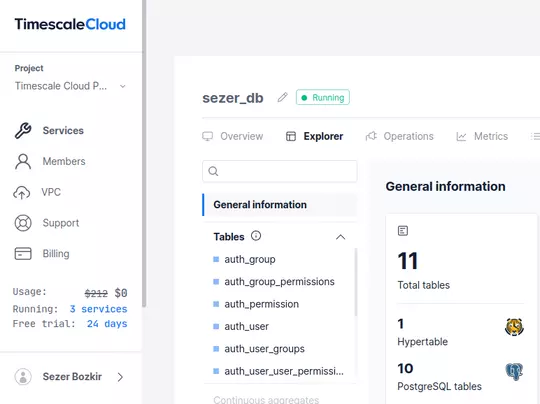
If there is interest, I am planning to write an article on how timescaleDB’s enhanced SQL queries can be prepared with Django ORM and comparative benchmark results in the 2nd series of my article.
You can find the codes of the article here;
https://github.com/Natgho/timescale-with-django
See you in my next post 🙂

